Tuesday 29 March 2016

Online Card Classes - Copic Markers for Card Makers Day 10

Hi Everyone, I hope you all had a great Easter weekend. As usual I went to church, then ate too much, but in addition this year, I bought some things from Simon Says Stamp and Seven Hills Crafts amongst a couple of other lovely shops, now that my Lenten buying ban is over. I have to tell you, it's been hard, and I have had a little splurge, but amazingly nowhere near what I may have bought originally!

I've been catching up with the Online Card Classes for Copic Markers and in Day 10, it was all about finishing touches. It reminded me of Kathy's Pop Up Colouring Challenge from August, which was all about lines, and I decided I'd add some details to a lovely little stamp set that Lucie sent me some months ago.


It's just a little scene, with no sentiment, as I wanted the card to speak for itself and to be flexible in use.

  
I stamped the little girl, the flower pot and the bird from Sunflower Sweetheart (I think it's retired as I can't find details anywhere online) onto some Neenah card stock with Memento Tuxedo Black and proceeded to then add details to the dress and the flower pot with my Copic Multiliner (it's a 0.3). I then coloured in with Copics in the limited yellows and light greens I have. 


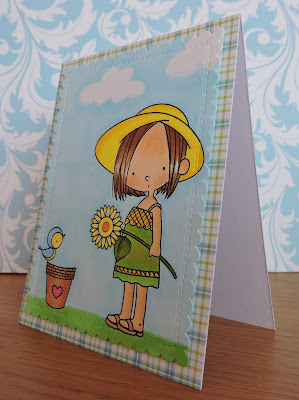
I felt it looked a bit plain, so I added a blue halo with B000 and B00, but then I thought it looked a bit odd, so I started colouring in the whole of the sky, adding in the outline of some clouds. Then I decided she needed to stand on something, so I added in some green for grass. 

I die cut out the panel with my WPlus9 Sunshine Layers die and added it with fun foam to an A2 card base which had some Lawn Fawn Perfectly Plaid paper on it. 

Below is a list of what I used to make this card and where I purchased them. Please note I DO NOT USE affiliate links :)


I love how it looks - just a little scene, and perfect for a spring time card to say Hello to someone.


Thank you so much for reading and for all your lovely comments. I am on the mend with my cold thanks to lots of hot toddies (whisky, lemon juice, honey, and extra whisky!).

Tuesday 22 March 2016

A Christmas Card - Already? - SPDSS #44

Hello there, Crafty Chums, how is your week going? Currently we are on week 4 of illnesses and I have now succumbed to the dreadful cold whilst everyone else is recovering. Typical. Hopefully we will all be well by Easter in a few days.

Speaking of Easter, I have made my first Christmas Card of the year. Yes, you read that right. I will not be caught out like last year and in a flurry of stress and panic, overdoing it and running myself down.

I had stamped the little elf image for colouring in during the last colouring challenge, but for some reason he got lost, and I rediscovered him in time for this month's Sugar Pea Designs Sugar Sketch Challenge. I've chosen to go with sketch number 44.

  
I wasn't quite sure on the background papers, but inspiration (and a beer and a curry one night!) struck me to go with the brightest papers I could find. The sentiment on the inside is "May your Christmas be Merry and Bright".


I coloured in the elf with Copic markers (apologies, I forgot to write down the colours), and then die cut him out with a SSS stitched circle. I cut the paper pieces from Lawn Fawn Let's Bokeh and Let's Polka to size and adhered them to a white A2 card base. I found a couple of flags I'd cut from Lawn Fawn Perfectly Plaid paper for a previous project and never used, and attached them to the card, placing the elf on top with foam pads.


It's bright and cheerful and I feel has put me on the right path to getting more organised and not leaving Chrismtas Cards to the last minute.


Below is a list of what I used to make this card and where I purchased them. Please note I DO NOT USE affiliate links :)

 
In other news, I won $50 in the Simon Says Stamp Wednesday Challenge the other week with my pirate card. Couldn't quite believe it as I was actually planning a purchase once my Lenten ban is over. I shall be primed and ready with my wish list on Sunday after church and Easter lunch! I'm pretty pleased I've made it this far without buying any new stamp sets or much else in the way of stash. It has not been easy with the constant releases that seem to happen and it has certainly made me realise that quite a lot of what I buy is based on want and not need and so I shall be stepping down my purchases as much as I can.

Would you like to see a video of what I get? I love 'haul' videos, so I'd love to share one with you too :)

Thank you so much for reading as always, and for leaving all your lovely positive comments.

Tuesday 15 March 2016

Tiger Wobbler - VIDEO

Well, Hello everybody! So, how has everyone been? Enjoying the Spring Sunshine? - not that it lasted that long!

Today I have a card and a video to share. I needed a birthday card for someone who I discovered like tigers. Having no tigers in my stash, I remembered I had a cat balloon which could be coloured in tiger colours. That's when I had my genius moment about doing a wobble action and decided to capture it all for you - seriously, that was my first ever attempt. You can tell me if you think I've been successful or not!


Hope you can tell which one is the wobble?? 

It was actually quite a simple card to make. Some quick Copic colouring of the 'tigers' on my main panel and some scrap Neenah, and then I die cut out the one I stamped on scrap card. To make the wobble, I die cut two of the smallest of my Spellbinders circle dies, and then wound some picture wire round the end of a Zig marker (coming in handy, just not for their intended purpose of colouring!!!) and snipped it with my jewellery snips (I use these for cutting the wire between dies). 


I attached one end to one of the circles with tape, and then put double sided tape on the back and stuck it to the tiger. I did the same with the other end and then stuck it to the card. Was quite pleased to see it wobbled. Maybe not as much as with one bought from a shop, and I put on too much wire, but, not bad for a first attempt. Just an aside, I wouldn't use these home made wobbles on for cards for children - the wire is quite sharp.

I added a strip of Lawn Fawn paper I found in my stash down the side of an A2 white card and then the panel on the top.


Below is a list of what I used to make this card and where I purchased them. Please note I DO NOT USE affiliate links :)


So here's the video to accompany this blog post, and I hope you find it interesting/enjoyable/useful/amusing - let me know what you think. Don't forget I'm still learning ;) 


Oh and a couple of you asked on IG what I thought of the Lawn Fawn Shammy. You'll see me use it in the video. I like it. I don't use it to clean my stamps straight off. I still use my scrubber pad for most inks, and then wipe off with the shammy to remove any remains of the stamp cleaner - I have found it can sometimes leave a little oily residue that can interfere with future inkings. It works really well at removing any traces that might not have scrubbed off. Definitely a good addition to my craft routine. I just keep it in a little IKEA snap seal bag, so it doesn't make any projects I'm working on wet. I take it out if I'm not going to be crafting for a while so it doesn't go mouldy in there :)

Hope you're all having a good week whatever it is you're doing. Thank you for reading and watching!

Blog design by aleelilydesigns