Why hello! So, now that my birthday is over, I'm going into Christmas organising full tilt. How I'm doing is debatable, but the will is there! I wanted to get at least 30 Christmas cards made and today I finished up another four to finally get there. I then decided to write my list for handmade cards and realised I needed 40..... so another 10 will have to be found from somewhere soon!
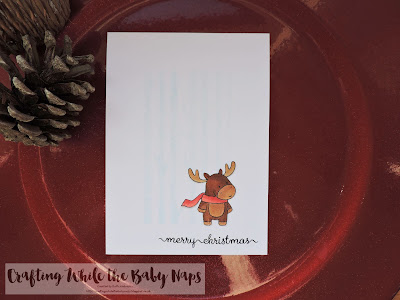
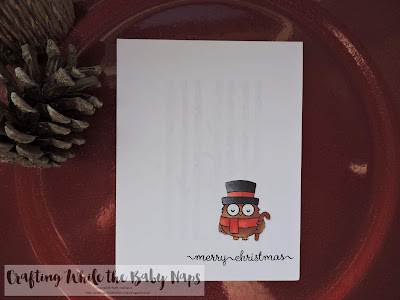
Anyway, here are the four I made today from Clearly Besotted Stamps supplies. Some very simple Copic colouring on the owls and moose before I fussy cut them. Then I masked of a central piece in on the card blank and lightly dusted different light Altenew inks onto them through one of the new Clearly Besotted stencils. This one is birch background and the inks are very light through them, and the photo doesn't do it justince. I then just glued on the moose and owls.
I then found an old set called Sweet Little Sentiments, which at one point I was going to sell and I'm glad I didn't. The Merry Christmas fited just nicely and I inked it up with some VersaFine Onyx Black as it give such a clean impression first time round.
That, as they say is that!
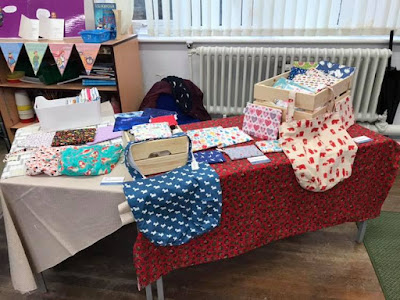
I did my first ever Christmas Fair last weekend. Just a little one in the school. Oh my was I nervous, but I've had so much support from all my friends and family, it really kept me going. I had a couple of 'too expensive' mutters, but apart from that it was very positive - and exhausting. If you want to find out what I've been up to with my sewing, you can follow my adventures on Instagram and Facebook, as well as my Etsy shop itself.
So I'll be back before Christmas I hope with some more cards now that I have to make those extra 10! Thanks so much for stopping by, Happy Crafting Everyone :)
I've been MICA (Missing In Crafty Action) for a few weeks as I've been working on finishing off stock for my Etsy shop and adding listings. Nobody should ever think Etsy is just take a photo, stick it in your shop and it will sell. You have to know what you are doing and I am very grateful to have the help of Jewellery and Gems with it. Getting my head around all that is needed to get noticed and to get sales on top of looking after the girls and the household just about finished me off last week! Onwards and upwards! It's nice to be able to switch crafts from time to time, so I had a good play with some Copic refills, acetate, card and some large stamps trying out the Alcohol Ink Lift Technique I've seen in passing - Teresa Morgan's video is very good. I know Ranger and Tim Holtz have come out with an alcohol ink lift stamp pad, but these days all my money goes on fabric, so I decided to try it with my Copic refills and some colourless blender as well as the copic cleaner.
I have a video of how I got on. Of course, during the process, my video camera died, so I had to scrabble around for the charger and the best results I had have been lost, but I hope you still find the other footage useful. Please remember that YouTube is a third party and as such you may want to look at its privacy policy if you have any concerns about cookies being placed on your machine.
What I've learnt is: Colourless Blender is best - the cleaner pushes the ink away too much A detailed stamps works better than a semi solid stamp Acetate works quite well, but it can take a while to dry, and it does leave it a bit sticky Don't put foil flakes on...... see video as to why! Don't put too much colourless blender on your sponge when using with stencils Have fun making a mess - I know Michelle Short uses gloves and now I know why!!
When it works it works really really nicely and I have three finished projects as you can see. I even made a shaker having seen Lisa's recent fantastic efforts. It's been a while!
Have you ever tried this?? It was a really great session! I've seen people using gelli plates with alcohol ink too, so maybe that's also something to try. Happy crafting everyone!
I'm staying on the theme of Christmas cards for the time being, and mass production, but unlike my last video, I've done a bit more colouring and added in some stencilling and die cutting. I've still kept it fairly clean and simple.
This is another of the cute angels from Pretty Pink Posh (you can get them in Dies to Die For in the UK). I've used a cloud stencil on the background, die cut the top panel with an MFT stitched window die and added a simple sentiment. I've popped up the die cut panel over the clouds and added in the Copic coloured and fussy cut angel with some foam pads. You can see more of the process in my video either below or over on my YouTube channel (this is an external site and will have cookies).
I'm also only 1 away from 300 subscribers! I know this is peanuts compared to some of you, but for me this is a huge leap, so thank you to everyone who stops by to watch and support. You are all appreciated more than you know!
I find with mass production as long as you have a clear production line, even more complicated cards can be pretty quickly done. I'm pretty busy with getting my Etsy shop up and running and have an Etsy mentor who is making me do lots of inventory and work on my processes and make up as many bags as possible.I'm hoping that in the next three weeks, I'll have some more in the shop. Watch this space! As always, thank you for stopping by and Happy Crafting :)
So I'm back and with a video too - yay! I'm finding that I have time on Fridays now to do a bit of mass producing and with Christmas coming up, the best kind of mass production are Christmas cards. I try to keep mine super simple when mass producing and these are the superest simplest you can possibly get. Card blank, some patterned paper (Lawn Fawn Let's Bokeh in the Snow which I've had for ages), and a plain stamped image on the front.
I've even managed to make a video of the process, so I hope you enjoy this little foray into my mass production of Christmas cards, which you can watch below (please note this links to a third party, YouTube, which may require Cookies) or via my YouTube channel. If you like what you see, would love to have you as a subscriber.
Wishing you a splendidly happy and crafty day, thanks for stopping by :)
I'm a bit sad not to be going to Happy Stampers this weekend (6th October), but since I'm still working through the products I got back in May when I went, and I recently purchased from Dies to Die For at the colouring class a couple of weeks ago, maybe it's not such a bad thing! I aim to get away in May when I've had a chance to have another destash, and save up as well. Anyway, Christmas is actually less than 3 months away now, which is slightly worrying as I have yet to get really going on my Christmas cards. Given a large amount need to end up half way across the globe, it's about time I started. So today I'm sharing this cute card I made with the Taylored Expressions Llama set I got from that trip to Happy Stampers back in May.
I do like mass producing Christmas cards, and this stamp set, which includes the dies, is rather good for that. Stamp, colour, cut and add to background, which was simply made using a snowflake stencil and a bit of scrap green card and a grass die. Both of those products were given to me by friends which makes them really lovely to use :)
I've made a set of these for my sister, so I am feeling good at having given this stamp set a really good play! I'm hoping to get into Christmas card mode now it's October, hopefully she says....hopefully! Thanks so much for popping by today. Happy Crafting Everyone!
A couple of weeks ago I did another colouring class with Faye Wynn-Jones. I officially finished my European Copic Colouring Programme earlier in the year and you can read all about my exploits in my earlier blog posts on ECCP 1 & 2, ECCP 3, ECCP 4, but I really benefit from the classes, so when the Crazy Chicks and the Starry Skies classes came up, I had to do them. Especially as the location had now changed to the next town over from me :) These are two of the shorter classes and were in the afternoon, which was a little odd, but nice as Jen came round to the house for lunch first and drove us both to the venue, where we met up with a lot of the usual crowd, including Dawn. Both classes were a lot of fun and as always having the shop next to it makes for a nice relaxed atmosphere where you are drawn to purchase things.... of course I did, despite telling myself I didn't need anything!
Crazy Chicks is all about colouring the Stamping Bella chicks as other birds like penguins and robins. This is so much fun! Jen then went off and coloured them as blue tits. It just shows you what you can do with a bit of imagination and some Copics. I learnt a lot about the colours to use for black - we used BV a lot for the penguins - and blending techniques that made the robins look very odd to start with, but with patience (not that I have a lot of that!), it all comes good.
Starry Skies is all about creating, well, starry skies and we coloured in this Gerda Steiner penguin with a very dark blue background behind him with snowflakes. This uses the colourless blender and the white gel pen. I think it would also look great with some Spica pens too. Had a great time as always, and I'm hoping Faye will be back up north with another class next year. There is talk of Copic backgrounds which would be a fabulous technique to have. These classes always inspire me to break out my Copics and try new things. I highly recommend! Thanks for stopping by, see you again soon. Happy crafting! :)
Hello! So it's been a few days since my last SugarPea Designs post and it feels a good time to just have a bit of a natter about what is going on in my crafty life. In short, I've been card making less and sewing more. With 3 months of SPD posts, I didn't have much in the way of brain space to do much other card making, which has affected my posting on here with anything but SPD, which I'm a bit sad about, but hope to remedy in the next few weeks. I then also decided that I would step up my sewing and open up an Etsy shop. Nothing like piling on extra pressure, eh? I love trying new things and I love that recipients of my bags really do love them, so it seemed a logical next step. I literally have no clue about Etsy, and feel a little bit swamped by all the jargon. As luck would have it though, I met a school Mum in Morrisons one day (my youngest and her eldest started school in the same class this year) and it turns out that she has three Etsy shops which bring in actual income. She is looking at her next step which is setting up local support networks for Etsy businesses. Our meeting couldn't have come at a better time! It is a huge and daunting task, but my mentor is being really supportive and tells me it is possible to make a living out of Etsy (after all she does it), but it's important for me to do lots of things to get set up. The worst is not buying fabric! Now I know I shouldn't buy too much fabric, but you know, like card making supplies, sometimes you need that 'hit' of instant gratification and cute and pretty prints can be hard to resist. It's not been all bad as buying and posting on IG and making and taking my things to colouring classes has resulted in 4 completed and 2 in process orders. But, she is right, I have a sizeable stash and have been doing an inventory of it all. You should try that sometime. It certainly brought me back down to earth! I'm heading to the Harrogate Knitting and Stitching Show in November though as it's my birthday, and I'm going to have a little spend, but just keep that between us, OK? It's really a fascinating process setting up in business. I have to remind myself it is a business, and with that I'll have to make some adjustments to what I make, and probably prices as well to take account of things I never really did before - like packaging and all the sundries I use like thread etc. It is going to be a lot of hard work too, but I am a pretty determined person, and it takes a lot to stop me - not even broken boilers and cars not starting yesterday stopped me sewing all my unfinished projects. I aim to keep this blog going, still with mostly card making, but I also hope to share some more sewing as I fill my shop with more things. It's almost 4 years old my blog and I've put a lot of hours into it over the years and I don't want to let it slide. I've dropped of IG and Facebook for the past few days as I did succumb to a bit of stress and needed to not have so much 'noise' going on to reset. I'm hoping to be healthier in my IG and Facebook habits and stop myself from mindless flicking and checking and worrying about stats. It isn't good for anyone's mental health, and I want to reengage with the community that I loved when I first started, on IG especially.
I've updated my Page about my Crafty Storage bags to link to my Etsy shop, so do pop by and have a look. It's very spare on product, but I do like to start backwards with things and just open a shop, then make things for it! Anyway, thank you all so much for taking the time to read and I hope to continue to see you here and your blogs too. Just keep swimming.... just keep swimming..... and breathe.....
Well today is my last guest designer post for SugarPea Designs and I just want to say a big Thank You to them for having me for the past three months, and for all of you for taking the time to read my posts.
This is really just to say that Frankly....... I think you are awesome! Don't you just love Frank?? I love Frank.... He's one of my favourite ever SPD characters. He's not at all scary and I feel he just needs a hug. He's from last year's Monster Mash set. I stamped him and the sentiment on some scrap green cardstock with VersaMark ink and used some Wow! Bright White Embossing Powder for contrast. No colouring today! I then just fussy cut him and trimmed the sentiment panel with my guillotine. You know how much I love patterned paper? I also love making my own and with a green and orange ink, I stamped away on a white card blank to create my random pattern. I used the adorable bats and pumpkins from the recent Darling Dragons set. It's a great way to use those tiny stamps you get in sets.
All I then did was pop Frank and the sentiment up with some foam pads and as the Mummy would say 'That's a wrap!' Thank you to Wendy, Stephanie and everyone at SPD for having me. That's All Folks!
Welcome to the Sweet2Repeat Blog Hop for the August release. You should have got here from Martha and there is a full list of on the SugarPea Designs blog.
I didn't get a chance to use the cute Bewitched set during the release, so it didn't take me long to ink them up and have some fun colouring.
Since doing my last Copic colouring class, I've really been trying to work on my no line colouring, so I inked up the witch on her broomstick with some Memento Desert Sand and got colouring away. It's not easy, but I really really love the challenge of trying to work out the shadows and highlights and the end result makes me feel I'm heading in the right direction.
Once I'd finished with my Copics, I added some details in with my Polychromos pencils. They work very well together and the wonderful Marika Rahtu, who sadly no longer does videos, has some great tutorials on her YT channel. I die cut the witches out and to add some interest in the back panel, I cut out some stars using the Sugar Cut - Star Dust die on some blue card stock and adhered a panel of yellow behind.
I then stamped and heat embossed the sentiment and popped up the witch and her hat with foam tape before I attached the panel onto a white card blank.
I love lots of things about card making; colouring, patterned paper and a punny sentiment. This card has it all. This set, Easily A'Moose'd, was on my wish list for a long time, and I got the Happy Camper paper pad to go with it.
Hubby and I are both big Star Wars fans (read the books and watch the cartoons type of serious fan!), so with our wedding anniversary coming up, this was perfect. The paper pad has fabulous patterned paper in it and the night sky was perfect, but I didn't just want the whole background to be sky, so I struck upon the idea of using the camp scene, and cutting out the white checked inner to use the outside as a frame. I used a craft knife and a steel ruler (stolen from my husband's model railway hobby!) and then a very steady hand for the intricate little bits. After attaching the night sky to my card blank, I attached some thin foam strips to the back of the camp scene frame and with my best effort managed to attach it to the card blank straight. I attached some foam pads to the back of the little moose which I'd coloured with Copic markers and fussy cut. I also coloured and fussy cut the marshmallow on the stick and attached it with some glue to the moose's hand - I think of it like a light saber..... As the paper is slightly shiny, I stamped the sentiment with some Stazon ink.
Thank you for taking the time to visit me today, and May the Forest Be With You To!
It's been a while since I had my Inktense pencils out. I bought three to try them out when I first started crafting and I then had to have the full set. They may be the colouring medium that lasts the longest as you really don't need a lot to colour with and I haven't sharpened any yet.
On some Winsor & Newton watercolour card, I stamped the BoHo Feathers in VersaFine inks - Smokey Grey and Onyx Black. The ones in black were the ones I wanted to colour so they would pop more. I took two blue-greens and two yellows and with hardly any water, I happily coloured in my feathers. I have a video showing Inktense colouring from a couple of years ago to show how I do it. It is very simple blending. I love the brightness of the colours and that they are permanent so don't reactivate if you get them wet again with another layer of colour. I then heat embossed the sentiment onto a piece of black cardstock and then adhered it to the front with my tape runner. I cut the panel down to size and then adhered it to an aquamarine card base.
Thank you so much for popping by. I love these feathers! Happy Crafting :)
Today is the day!!! I have one last card to share with you to whet your appetite for the release coming at 6pm, EST over on the SugarPea Designs website. Don't forget to visit the SugarPea Designs blog every day and comment for a chance to win a daily prize!
Today showcases the Eucalyptus Wreath set and the Grateful Word die. This word die is a beautiful script. This is a technique I've used before and have a video showing how to do it. It's really simple ink swiping. I took a white card blank, masked off a rectangle in the middle, picked my rainbow distress inks and swiped away. I removed the masking tape and placed the card in my stamping press and stamped the leaves in VersaFine Onyx Black. I then die cut the sentiment three times in white cardstock and glued them together to make it pop.
What has been your favourite set this release? I've really enjoyed having a play with them all.Thank you so much for popping by today :)
Day 4 of the sneak peeks, so the release is almost here! Today's card is super CAS using the Birthday Balloons. I love the stamps as they leave pretty patterns and it gives the balloon great dimension.
This was so simple. Stamp the images in different colours, die cut the images, pop them up with some foam pads, add a sentiment at the bottom, draw lines (there is a stamp, but I wanted mine to be wobbly!) and add a free hand border. Almost one layer!
The release will be available on Friday 24th at 6pm, EST time from the SugarPea Designs website. Don't forget to visit the SugarPea Designs blog every day and comment for a chance to win a daily prize!
Tomorrow is the big day of the release and I'll be back with another card for the final sneak peek!
Hallowe'en is approaching and I know some of you will be getting well into making cards for that. Here in the UK, we tend not to send out cards specifically relating to this festival, so I've used these Darling Dragons for a quick card just to say Hello.
I've cut a piece of watercolour card with the SugarCut Birthday Journal Card Die and stamped the image and sentiment in VersaFine Onyx black as you can watercolour with this ink. Isn't that bat the cutest?? I think he might be my favourite stamp in this set!!! I then watercoloured to my heart's content with a Daniel Smith dot sheet, some Winsor & Newton Cotman half pans, and Gansai Tambi Pearl and Gold. I just love mixing and matching! I then found a bright piece of patterned paper from the Life Is A Carnival Pad and attached it to the back of a white card blank - they fit perfectly on a US A2 sized card - before attached the watercolour panel on the front with foam to pop it up.
The release will be available on Friday 24th at 6pm, EST time from the SugarPea Designs website. Don't forget to visit the SugarPea Designs blog every day and comment for a chance to win a daily prize!
Thank you so much for popping by and come back tomorrow for some more sneak peeks :)
Welcome back for more of the September release. Today we are showcasing the Seeing Stars stamp set and the Stacking Stars die. I've gone very clean and simple today and also done something I haven't done before - used alcohol inks!
The only alcohol inks I own are Copic refills. I have about 8, most of which are brown, but a few are light blue. I also don't own any Yupo, but I discovered through watching various videos that you can use acetate and so I did a bit of experimenting dropping inks and blowing it around with a straw. It's unpredictable and ended up quite sticky, so I found some glitter flakes someone gave me ages ago and rubbed it on in the stickiest places and got some nice results. Once dry, I attached the finished piece onto a white card blank (US A2) with some adhesive tape at the edges. Then taking the Stacking Stars die, I ran it through my die cutting machine on a piece of white card stock cut to fit the front of my card base. I didn't split the dies, so it gave a very uniform gap between the stars. The sentiment is from the Seeing Stars set and I simply stamped it with some VersaFine Onyx Black. I then attached loads of 3M foam tape to the back of the star panel and attached it to the alcohol ink panel.
I love the result I got from the ink and I will definitely try again as I get more refills for my Copics. It didn't use up a lot and means I have to invest less in more new products. My friend Ale Suta has a great video using her alcohol markers on some glossy cardstock that is worth a watch. The release will be available on Friday 24th at 6pm, EST time from the SugarPea Designs website. Don't forget to visit the SugarPea Designs blog every day and comment for a chance to win a daily prize!
Thank you so much for stopping by today, do come back tomorrow for more inspiration :)
Welcome to the first day of the September release at SugarPea Designs! Today we are showcasing the To Infinity & Beyond stamp set and the cute sweet incentive, Over the Moon. I decided to make the latter the main focus of my card as that sun hugging the moon is so adorable.
I Copic coloured the main images, and all the planets from the To Infinity set and die cut them out.I wanted a dark background, with a space feel, so I took a scrap piece of blue cardstock I found in my stash and added some splatter with white gouache and several Spectrum Sparkle pens. I heat set it to save a bit of time and adhered it to an A2 (US) sized card. I wanted the planets revolving around the sun, and off the edge of the card in places, so I cut some strips of acetate, attached the planets to one end and then the other end to the back of the sun. I then attached the sun to the middle of the card. The sentiment was stamped on some acetate with black Stazon and then attached with some vellum adhesive, as it is clear. I felt it needed a little sparkle from some tiny little stars.
The release will be available on Friday 24th at 6pm, EST time from the SugarPea Designs website.Don't forget to visit the SugarPea Designs blog every day and comment for a chance to win a daily prize! Come back tomorrow for more release fun! Thank you so much for visiting me today :)
If you've been following my recent exploits on Instagram you'll have seen me advertising that I was going to make a box card. Well. I did! I've never made one before, feeling that they were quite a lot of work and I'd need at least a week to make one.
Well, turns out they aren't too bad after all. I watched Ale Suta's video and had a read of this tutorial from Papermill Direct. Once you've worked out the basic principals of the box card, it's not too difficult to put it all together. I finally got round to colouring in all these images from the Go Wild Again set from Clearly Besotted. I used my Copic markers and then fussy cut them out. A poll on Instagram suggests many of you don't like fussy cutting, but I LOVE it, so I even cut out the little frogs. I made up my box card with some Stampin' Up papers I hadn't got round to using yet, and attached all the images with thin strips of acetate. The box card then folds down to a nice square size and then will pop up again quite happily.
They really look very effective, and although they take a bit of time to put together, the results are worth it. Definitely one to do again. Thanks for popping by!
I bought this adorable piggy set from Stampin' Up at the time of the new catalogue release in June. It's not a brand new one, but I kept thinking about it since I saw it in the last catalogue, and decided it had to be added to my collection. I've used it a couple of times and it's great for colouring and also for just plain stamping. They are just hilarious!
I stamped it onto some Copic friendly cardstock with some light ink - I use Desert Sand - and decided I had to try no line colouring again. I find this incredibly difficult as I have still to grasp the concept of light source and shading, but unless I practice I will never get it! I have done my best with getting the shading and the particular pink correct, and I'm actually relatively pleased with it for once. After colouring, I stamped over the sentiment (it's attached to the image) with Tuxedo Black - this is where a stamping press works really well as you can leave it on and then stamp again and know it will be in the right place. I then cut it down and mounted it off set onto a card blank with some Lawn Fawn Let's Polka paper on it - one of my favourite paper pads ever! Thank you all of you who visit and leave comments, it is appreciated more than you will know. You make me happy :)
I've been thoroughly enjoying going through some of my older sets and some time ago I stamped a whole load of these little ducks out and coloured them in with my Copics while at a crafty weekend with some friends. Do you do that? A whole load of colouring then you leave them and wonder what to do with them? Well I used two on this card! I love that this set is called Quackers, so I made them a little crazy.
I also used some patterned paper from SugarPea Designs. I LOVE their patterned paper. I love that it is really nice and thick paper and that it's cut to fit a US A2 card, which is the size of card I generally make, so I don't have any waste. This is from the Whatever The Weather collection. I attached the piece of patterned paper to the front of my card and realised instantly that I shouldn't have done that without putting in the pink split pin first..... so after putting in the split pin, I then attached it to another card front. It's got extra support now!
I stamped my sentiment on a scrap piece of card and gently glued the ducks on either end. I poked a hole in the sentiment piece and attached a piece of baker's twine to it and then round the split pin. They hung around for quite a while like that as I coloured in and fussy cut out the lilypad and bullrushes. I glued them in the corner and then with some foam pads, I secured the ducks at a jaunty angle. Quackers, right?
Thank you so much for joining me again today. Happy Crafting :)
I am terrible at sending birthday cards, so I tend to focus on cards I can send out at any time of the year. The Chunky Monkey set is very versatile with different cute images and perfect for birthdays and all year round cards.
Do you know the story of Day Monkey, Night Monkey by Julia Donaldson? My youngest has it and it was her favourite book for ages. She had two little monkeys that she took to bed every night for weeks, so as soon as I saw these monkeys I had to colour them the same. It's such a sweet story for bedtime reading.
I stamped them on Copic friendly cardstock with Memento Tuxedo Black and coloured them in with my Copics, one light, one dark. I then fussy cut them out, cutting between the two tails so I could cut all the white away.
I stamped the branch onto another piece of Copic cardstock and coloured with my Copic markers. I then cut around the branch, and you could partially die cut the circle with your Zig Zag Stitched Circles as it will just leave the aperture and not the stitching. I took an A2 (US) white card blank and marked lightly on it where the aperture would be and masked a rectangle around it. I then inked the area in distress inks to make a sunset scene. I die cut the branch panel out with the scalloped die from the SugarCut - Birthday Journal Card and stamped the sentiment from the Chunky Monkey set at the bottom. All I then needed to do was assemble it. I used foam tape to place the branch panel on top of the card blank and very gently glued the monkey tails over the branch and applied a little glue behind the dark brown monkey for security.
Thank you so much for joining me today. Happy Crafting :)
Hi Everyone, I'm absolutely thrilled to be Guest Designing for Sugar Pea Designs over the next three months. I've been a fan of theirs since I started crafting and the first thing I bought was the Home Sweet Home SugarCut and so I thought it would be nice to start my term by showcasing this. I have used it quite a number of times, making it one of my most used dies.
I have a video to accompany this post, which you can watch here, or over on my You Tube channel.
I took an A5 (UK sized) piece of Bristol Smooth cardstock and cut it in half and started inking up a galaxy background with some bright distress inks. In between the bright splotches I added some Black Soot. This highlights the bright spots and makes it into the galaxy. I need some more practice using the Bristol Smooth I think, as it is so smooth I felt it didn't blend as well as I'd like.
I then took some white gouache and mixed some up with water to make splatter and added it on top of the panel, along with some Clear Sparkle Pen.
Then I took some white card stock and die cut out the SugarCut Home Sweet Home and the SugarCut Homescape. I was very careful to remember to keep hold of the little windows and the heart and the piece between the M and E! I then stamped the sentiment from the Sweet Sentiments - Home set.
I cut all the pieces down to fit an A2 (US) card base and adhered the galaxy background. I then popped up the die cut pieces with some foam tape, adding in the little die cut out pieces with some multi medium matte.
Thank you so much for stopping by today. I'll be back again soon with more SugarPea inspiration. Happy Crafting!
Do you ever wonder why you spend so much on craft supplies, especially colouring media, when you can use your children's pens and get really great results?
A while ago to entertain the kiddies one day after school we got out their blow pens and I decided to join them with my own stencils and I used this gorgeous one from Simon Says Stamp that I got some time ago and just haven't used to its full potential.
While they were occupied using pink, purple and orange on balloons, I pinched three colours, two green and a yellow, and with just a basic white card blank I used my stencil and blew gently to create the pattern. You do have to blow fairly gently and steadily, something the children still have to work on.
With my Lawn Fawn Love die and some scrap green card I had, I die cut three and layered them up to get some dimension. I added the 'nature' from my SSS One With Nature set with some VersaFine Onyx Black before placing the 'Love' above.
Simple and yet so effective. It won't put me off buying Copics, but I may play with more of my kids supplies too! I would recommend washing your Blow Pens out after use - especially if you've had other children using them too. They do store quite a lot of moisture!
It was my sister's birthday recently and I couldn't resist reminding her of one of our little pets from when we were growing up. We had two guinea pigs, one called Gnipper (after Dennis the Menace's dog), who lived for 6 years and then Pip who sadly only lived for 2. We loved those little piggies. Both Abyssinians, but Gnipper was the ginger, white and brown one with the tufty hair and the one I based my card on.
I took a piece of Copic friendly card stock and stamped a couple of images onto it and happily coloured away to try to get brown, 'white' and ginger. I then fussy cut one out. On an A2 (US) white card blank I masked a rectangle in the centre of and got my mini cloud stencil from MFT and inked up rainbow clouds. I then die cut some grass for little Gnipper to stand behind and attached it to the bottom of the inked panel before deciding I needed a frame, so I die cut one from my MFT rectangle frames and attached it around the inked centre with some foam tape. All that was left to do was attach my furry friend in the middle with some foam pads.
So now you've got this far, I have some exciting news for you. I was asked some time ago to Guest Design for Sugar Pea Designs for 3 months from July - September. I know! Can you believe it? Little old me getting to play with some of my favourite stamps - what's not to like? Look out for my first post coming up soon. You can read more about it on the Sugar Pea Designs blog where you'll see this crazy picture....
Hello! I'm getting in a very quick post as a last minute attempt to get a card in for the current Copic UK Facebook Group challenge. As usual it's anything goes, but with additional challenge of paper piecing with some Copic colouring on top. Now you know I love paper piecing, and finally I got round to it - only 4 hours to go!
I finally used this adorable diver set from Clearly Besotted called Under the Sea which I hadn't used before - yay for NBUS! - and stamped it onto different pieces of scrap cardstock. I think it's all Lawn Fawn. I stamped using Memento Tuxedo Black as I knew I was using my Copics on it later. I stamped his head and hands onto Copic card stock and coloured his head and hands with Copics.
I fussy cut, and I fussy cut, and I fussy cut some more! I then happened across a blue card blank I'd cut ages ago but decided wasn't right for the card. Well, it was perfect for this one. I stamped the diver onto it and with some acrylic glue, stuck all the pieces on top. I added the jelly fish, seaweed and fish around him. I then added a bit of added colour with my Copics, but you really can't see the different in the pictures I'm afraid. I was quite cautious, except with the choice of orange for the fish and jelly fish!!
I then took a wave stencil (mine is from Create a Smile) and with a piece of cut n dry foam, dabbed on some white pigment ink to give some added texture.
The sentiment is also from the set and just stamped using VersaFine Onyx Black onto some white card stock.


